Showing posts with label vegetarian. Show all posts

Sunday, December 27, 2015

The Yummiest Malai Kofta Curry

Malai Kofta Curry
Hii..
Being a Bengali I am a die-hard non-vegetarian..Yes from Fish, Lamb to Prawns and Crabs, I am crazy about anything non veg. But still there are a few Vegetarian dishes which make me drool and one of them is Malai Koftas..Yes these soft Paneer Koftas in a smooth creamy gravy always makes me drool..I have had these at some wedding or at someone's place but never tried my hand at it looking at the cumbersome process.. But one fine day I decided no I really need to try this and to my surprise it wasn't that much of an Herculean task, in fact I was done in an hour. (I have taken the recipe from a site 'Veg Recipes of India'

Note: The two highlights of this dish is that the Koftas should be really soft, melt-in-the-mouth and the gravy shouldn't be very oily and spicy..just a smooth creamy light flavoured gravy.Thankfully I could fulfil both the points on my first trial.

MALAI KOFTA CURRY

Makes: Around 24 Koftas (For 8 people)

Ingredients

For the Koftas


    400 gms paneer/cottage cheese, grated
    3 medium size potatoes, boiled, peeled and mashed
   1/2 tsp red chili powder/lal mirch powder
    2 tablesps cornflour
    1/2 teasp garam masala
    2 tablesps chopped coriander leaves
    Salt as required
    Raisins - 60 pcs
    Refined Oil for frying the Koftas

For the Gravy/Curry:


    3 large Onions (paste)
    200 gms cup Tomato Purée
    25-30 Cashewnuts soaked in warm water for 30 minutes and then blended to a smooth paste
    1/2 tsp Turmeric powder
    3/4 tsp Red chili powder/lal mirch powder
    2 inch Ginger/adrak - 8-10 Garlic cloves/lahsun - made in to a fine paste
    1/2 tsp Garam masala
    4 cups water
    2 tsp kasuri methi/dry fenugreek leaves
    Salt as required
   Sugar as required (optional)
   Refined Oil
   200 ml Fresh Cream
  Whole spices/garam masala :1 bay leaf/tej patta, 1 inch cinnamon/dal chini, 1 or 2 black cardamom/badi elaichi, 2-3 green cardamom/hari elaichi or choti elaichi, 2-3 cloves/laung

Procedure1. Mix all the ingredients mentioned under kofta ingredient list except oil in a bowl.

Combining the ingredients for the Koftas


2. Take a portion of the mixture, flatten it in your palm and place 2-3 raisins then bind it into medium sized balls.


Binding the Balls

3. Fry the koftas in medium-hot oil till golden. Keep aside.
Frying the Koftas


4. In another wok, add 2 tablespoons of Refined Oil and add all the whole spices and fry till the oil becomes fragrant.

Preparing the Gravy

   
5. First add the onion paste and brown it.Now add the ginger-garlic paste and fry for some seconds till the raw aroma of the paste goes away.

6. Add the turmeric powder, red chili powder, garam masala powder and Sugar(if required) and saute.

7. Add the Tomato Puree and mix further and fry till the oil separates from the masala.
Left: Tomato Puree --------------------------Right:Cashewnut Paste
8. Add the Cashewnut paste and mix well.

9. Add the water, mix and cover the wok and let it simmer

10. While it is simmering add the Salt.

Gravy almost done

11. Add the Kasoori Methi leaves and the fresh cream (keep aside 2 tablespoons of cream for garnish)

12. As the gravy thickens switch off the flame

13. In a bowl place the Koftas and pour the gravy over it. Garnish with Fresh Cream and coriander leaves.

14. Serve Hot with Naan or Roti.

Tips: While combining the ingredients for the koftas, initially add the given amount of cornflour and make a small ball and fry it in hot oil. If the ball doesnt retain its shape and breaks down then add a little more cornflour to the kofta mixture an test again. Try not to put extra cornflour as it will spoil the texture of the Koftas, put just enough so that the koftas hold together while frying.

Bon Appetite
Thanks for reading!! Ciao!


Monday, December 21, 2015

Winter Evenings and a One-Pot Meal (Vegetable Noodle Soup Bowl)

VEGETABLE NOODLE SOUP - ONE POT MEAL

Hi.. I Love Winters-"Period" ..probably because the dreamer in me feels more enthusiastic in this weather.. And when it comes to food then all the fresh colorful vegetables available in winters always make me smile!
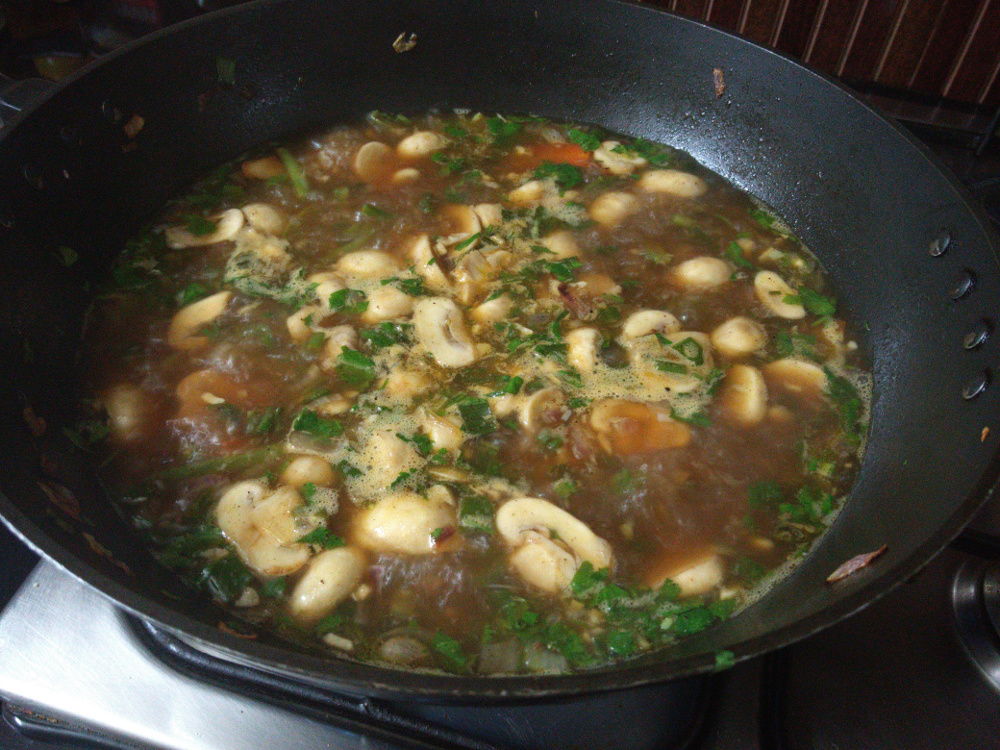
One such winter evening when me n N felt like having something simple yet yum, that is when this idea popped into my head..Why not turn all the vegetables in the refrigerator into something so perfect for a cold winter night..So here it is..A warm tasty ONE POT MEAL - VEGETABLE NOODLES SOUP BOWL. This is an extremely simple healthy and delicious full meal.
P.S: If you have chicken available in your fridge you can add boiled shredded chicken to it.

ONE POT MEAL - VEGETABLE NOODLE SOUP
Makes: Four bowls


Ingredients
Colorful Veggies

Button Mushroom: 300gms
Beans : 50gms
Carrots: 2 large
Spring Onions - 6 stems

Onion - 1 medium
Garlic - 5 -6 cloves
Ginger -  2" piece
Butter - 1 tablespoon
Refined Oil - ! tablespoon
Salt - to taste
Black Pepper Powder - 1 tsp
Soya Sauce - 1 tsp
Vinegar - 1tsp 

Red Chilli Sauce 1.5 tsps
Tomato Sauce 1.5 tsp
Lemon Juice - 1 tablespoon
Coriander leaves - 2 tablespoons
Ajino Moto - 1/2 tsp (optional)
Boiled Egg - 2 (optional)
Noodles - 200gms
Sugar - 1tsp
Water/vegetable stalk - 6-7 cups
Preparations


Procedure

1. Chop the Onions, Spring Onion Whites and Green and the Coriander leaves

2. Slice the Mushrooms, Carrots and Beans

3. Mince the Ginger and Garlic

4. Boil the noodles and drain the water and keep aside


5. In the same pan, Heat the butter and oil and stir in the Ginger and garlic, add the chopped onions and spring onion whites and stir

6. Add the mushrooms, carrots and beans and stir well.

7. After a few minutes and the chopped spring onion greens (keeping aside 1 tablespoon for garnish), stir well

8. Add the Salt, Sugar, Black Pepper Powder and Ajiono Moto (optional) and stir.

9. Add the sauces and mix well

10. Add the water/stalk and cover and let it simmer


11. Cook for around 10 minutes

12. When the vegetables looks done..Add the Lemon Juice and Coriander Leaves

13. In a bowl add some boiled noodles and pour some soup and vegetables over it. Garnish with spring onion greens and Sliced Boiled Egg.

Serve HOT!!!

Enjoy your ONE- POT MEAL!!!

Ready


Monday, December 14, 2015

The Any Time Snack - Garlic Bread Pinwheels

Garlic Bread Pinwheels
Hi....
I have always found Baking Breads very intriguing..There is always an element of suspense from the start till the end..And honestly a delicious home-baked Bread is always a pleasure for the family..
Me n N are one of those couples who find the regular 'Dal-Roti-Sabji' meals extremely mundane.. Its not that we always need something exotic to eat but yes definitely something different.. Some Garlic Bread and a bowl of Soup is one such example of a meal which we both thoroughly enjoy..

So here I was trying my hand at something which I had never tried before.. After browsing through the net I settled for a recipe on 'Café Garima'..
Though I named them 'GARLIC BREAD PINWHEELS'.. They turned out to be so delicious and went extremely well with a bowl of steaming hot soup, a perfect dinner for 'Dilli ki Sardi' ..

GARLIC BREAD PINWHEELS

Makes
: Around 14-15 Pinwheels


Ingredients

For the Dough:
3  cups All purpose flour  (Maida)
1 tsp Instant yeast or 1 1/4 tsp Active dry yeast (If using active dry,proof in 1/4 cup of warm milk and a tsp of sugar from the recipe)
1 tsp sugar
1/2  tsp salt
1 and 1/4 cup warm milk
2 Tbsp olive oil/butter(melted)

For the Filling

2 Tbsp butter at room temperature
1 tsp mixed herbs (Optional) oregano,basil,rosemary and garlic powder,can use fresh or dry
¼ tsp fresh ground pepper
¼ tsp salt (If using unsalted butter)
1 Tbsp minced garlic
2 Tbsp fine chopped cilantro/coriander leaves
2 cubes of Processed Cheese

Procedure1. I think the most important thing while baking a bread is 'proofing of the yeast' .

I used 'Active Dry Yeast'..Proof the yeast by adding the sugar to 1/4 cup of warm milk. Mix well. The milk has to be just the right temperature- not too hot because that will kill the yeast not too cool because the yeast won’t proof. Add the yeast and mix , sprinkle some sugar granules on top of the yeast and rest covered for 10-15 minutes. The yeast should froth like soapy bubbles. If it doesn’t, throw the mix and start afresh.
Please Note : Never ever use the yeast if it hasn't turned foamy.

Left - Foamed Yeast--- Right - Flour
2. In a big bowl, take the flour, salt , melted butter/oil ,sugar and yeast. Mix well.

3.  Now add 1 cup of warm milk little by little in batches and keep mixing the dough.

4. Once the dough starts taking a shape transfer it to a flat surface and knead the dough for around 8-10minutes.
Please Note: Dough should turn soft, if its dry add little milk, if sticky add little flour

5. Transfer the dough into a Oiled Bowl (much bigger than the dough size). Cover with cling film or kitchen towl and leave at a warm place for 1.5 - 2 hrs for it to double in size. This is the second proofing. More than the time the doubling in size is important.

The filling
6. When the dough is almost twice, you can start making the filling in another bowl. Mix all the ingredients (except the cheese) in the bowl. It should look like a spread.

7. Once the dough has doubled, unwrap it and punch down the air gently. Now divide the dough into two halves.

8. Roll each half into a flat oval about 1" in thickness .

9. Spread the butter filling over it and then grate the cheese cube over it (1 cube per roll)
Rolling it Up
10. Now Roll the dough into a cylinder and cut into equal pieces with a sharp knife.

11. Grease you baking dish with butter/oil and place the pinwheels on the baking dish.

Ready to be Baked
12. Cover with cling film and keep for another 15-20 mins for re-proofing. It will rise some more and look fluffy

13. Preheat you oven at 200 degrees Celsius

14. After 20mins are done. Gently brush some milk over the pinwheels (milk-wash).

15. Bake at 180 degrees Celsius for 22-25 minutes till the surface looks golden.

16. Serve Hot.

It goes every well with Soup and you also add some Grilled Chicken to the Menu.
Bon Appétit

Garlic Bread Pinwheels

Saturday, September 19, 2015

There is always time for a slice of Chocolate Cake

Rich Chocolate Cake covered with Chocolate Ganache
Hiii..
Writing again after a Two Month long hiatus..A lot of interesting things happened in these two months.. The highlight ofcourse being a fantastic trip to Ladakh (India) with my family...What Do I say about Ladakh..Its really difficult to put in words what I felt there..The snow peaked mountains, the grasslands, the people, the rivers, everything was breathtaking!! Such places always remind me of the beauty of nature and how extraordinary our planet is!

The Beautiful Ladakh
But a nice vacation always means coming back to a lot of pending work..And that is what happened when I got back..
Well now that things are kind of back to normal, my hunger pangs tend to set in and what better way to satisfy our tummies than Baking a Rich Dense Chocolate cake covered with mouth-watering Chocolate Ganache.(Who doesn't love a Chocolate Cake anyway)
Most of us have this habit of walking towards the fridge every hour and opening it thinking something new would have suddenly appeared into the refrigerator out of nowhere. Well I am no different, if not every hour but I do this atleast 10 times a day and sometimes it is indeed helpful.
Ingredients
Last evening I noticed some left over Unsalted Butter. What now, well I ll do what I love the most and that is 'BAKE'. I weighed the butter and it was about 90gms so I had to find a recipe which would fit this. After browsing through a few recipes I found one which would be just ideal for this much butter and that is a Quick Rich Chocolate Cake and well why not cover it up with some Ganache. I followed the Chocolate Cake recipe from 'Joy of Baking' and Taaadaaa the Cake was ready in a jiffy. The only precondition was the Cake covered with Ganache needed a few hours to Set properly so I had to resist myself for the night. But Yes the first thing I had in the morning was a slice of Cake.

Note: This is an extremely simple recipe without any requirement for a stand/hand mixer. This is a dense cake adding to the richness of chocolate

Mixing the Dry Ingredients
RICH CHOCOLATE CAKE COVERED WITH CHOCOLATE GANACHE

Makes
: An Eight Inch Cake

Ingredients

Chocolate Cake:1 1/2 cups (195 grams) all purpose flour

1 cup (200 grams) granulated white sugar

1/4 cup (25 grams) unsweetened cocoa powder (not Dutch-processed), sifted

1 teaspoon baking powder

3/4 teaspoon baking soda

1/4 teaspoon salt

1/3 cup (75 grams) unsalted butter, melted

1 cup (240 ml) warm water

1 tablespoon lemon juice (or vinegar)

1 teaspoon pure vanilla extract

Chocolate Frosting:

6 ounces (170 grams) semi-sweet chocolate, chopped

3/4 cup (180 ml) heavy cream (35% butterfat)

1 tablespoon unsalted butter, room temperature


Preparing the Cake Pan for the final Cake Mix
Procedure:
1. Preheat oven to 350 degrees F (180 degrees C) and place rack in center of oven.
2. In an bowl stir together (with a whisk) the flour, sugar, sifted cocoa powder, baking powder, baking soda, and salt.
3. Add the melted butter, water, lemon juice, and vanilla extract. With a fork/whisk, mix all the ingredients together until well blended.
4. Prepare the cake pan by greasing it with butter and then flouring it. }
5. Pour the cake mixture into the pan.
6. Bake in preheated oven for about 30 minutes, or until the cake springs back when lightly pressed and a toothpick inserted in the center of the cake comes out clean.
7. Remove from oven and place on a wire rack to cool.
The Freshly Baked Cake
FROSTING with GANACHE :
8. Place the chopped chocolate, cream, and butter in a heatproof bowl.
9. Place over a saucepan of simmering water and melt until smooth.
10. Remove from heat and let stand at room temperature until it is of pouring consistency.
11. Place the wire rack (with the cake) on a plate covered with wax paper. Then pour the frosting over the cooled cake so that the extra ganache drips down.
12. Keep in the refrigerator for 4-5 hours or preferably overnight

Preparing the Ganache
Pouring the Ganache
Important Points:

1. Before pouring the ganache make sure the cake has cooled down (you can also chill it in the fridge)
2. When you prepare the ganache initially it will be thin, as you keep it to cool down it will thicken, but take care that the ganache shoould not be extra thick and should remain in its pouring consistency
3. The extra ganache can be used to make chocolate truffles (though we just gobbled it up before that hehe)

Thanks for reading..Keep Calm and Eat some Chocolate Cake!!

Chocolate Cake Fan Forever

Friday, July 17, 2015

Breakfast with Instant Rawa Uttapam

INSTANT RAWA UTTAPAM

Ingredients
My Rule - "If the Breakfast is good the entire day is bound to be good".. Yes I really can't have cereals or simple bread in the morning..I need something different everyday..
And that's the reason I rush into the kitchen just after my morning tea.. But deciding what to make is a pretty taxing thing to do..
Well during the initial two years of my career I used to teach Physics..Yes I know its a shocker..I won't say I disliked doing that but within those two years I understood that this was not meant for me..I was not made to do a regular 9-5 job..I wanted my own flexibility..And that is the reason I gave it up and joined the husband as a free lance web developer.
Well why am I telling you all this is because the following recipe was given to me by one of my colleagues back then and I am really thankful to her because not just me the entire family loves it!! This is an Instant Rawa Uttapam which can be prepared in a jiffy.. Here goes the recipe...

Sooji-Curd Mix
INSTANT RAWA UTTAPAM

Makes: Around 8 Uttapams

Ingredients

Rawa/Sooji - 2.5 cups

Curd - 1 cup

Tomatoes - 2 small

Onions - 2 medium

Green Chillies - 2-3

Coriander Leaves - 2 Tablespoons (chopped)

Salt - to taste

Black Pepper - 1.5 teaspoons
Water

Refined Oil for frying

Procedure
Batter
1. In a bowl mix the Sooji and the curd properly (it will looks like a paste/dough) and cover and keep for around 20 minutes

2. Chop all the vegetables

3. After 20 minutes add Water to the Sooji Mix and mix till it forms a smooth batter

4. Add Salt, Pepper and the vegetables (remember to take into account the vegetables while adding Salt)

5. Take a NON-STICK Tawa and heat 1 teaspoonful Oil

Spread the Batter
6. Pour 2 ladles of the batter and spread it (the way you do it for am omelette)

7. After around 20 secs with the corner of your spatula make a few small holes on the uttampam

8. Place few drops of Oil on each holes and let it cook
9. Turn the Uttapam and fry the other side
10. Serve Hot with Chutney (I prefer it with ketchup or chilli sauce).
Instant Rawa Uttapam
The biggest advantage of being a free lancer is taking out time to cook whenever I want to!! Thanks for reading and Do try this at Home!! Ciao!

Sunday, July 12, 2015

Sunday Lunch with Veg Yakhni Pulao/Pilaf

Veg Yakhni Pulao/Pilaf
Since I was a child Sunday Lunch used to always be special.. Being a Bengali, Maa's favourite used to be Mangsho Bhaat as in Mutton Curry and Steamed Rice... Arpi (sis) and me used to finish off with our homework right in the morning and then kept playing till Maa's Mutton Gravy's aroma made our tummies growl with hunger and our mouths drool..
Many years have past and Maa still continues to make something special on Sunday and makes me miss her even more on these days..

Today being a Sunday, the Husband n Me decided to move our lazy bones and do something special with Rice and Mutton..

N (the husband) chose a Kashmiri dish - Mutton Kabargah (for the recipe click here), his patented dish which I am crazy about.. I decided to make a type of Kashmiri Pulao/Pilaf to go with it which I have never tried before..After browsing through the net I found a very interesting recipe. It was Veg Yakhni Pulao (adopted from http://www.vegrecipesofindia.com/vegetable-yakhni-pulao-veg-yakhn-pulao/)..Since we Bongs like our Pilafs slightly sweet, I added some sugar in the recipe. This one's extremely light on the palate yet very flavourful!! Hope you all like it!
Getting Started


Note: Yakhni means Stock in Kashmiri. Here the Rice is cooked in the vegetable stock, You can try this with Mutton or Chicken also.
Bouquet Garni refers to a bundle of herbs/spices tied together in a muslin cloth and placed in the pan of water with the vegetables/meat to enhance the flavour of the stock.

VEG YAKHNI PULAO / PILAF

Makes: 6-7 servings
Bouquet Garni

Ingredients

For the Bouquet Garni:
3-4 strands of mace
1 tbsp coriander seeds/dhania
½ tbsp caraway seeds/shah jeera
3 cloves/laung
2 inch cinnamon/dalchini
¼ tsp nutmeg/jaiphal
½ tbsp chopped ginger garlic

For the Veg Yakhni:
2-3 cups chopped veggies like cauliflower, carrots, beans, peas
5 cups water
salt

For the Pulao/Pilaf:
Vegetables chopped up

3 or 4 tbsp ghee
2 cups basmati rice, soaked for 30 minutes
1 tsp caraway seeds/shah jeera
1 tsp ginger garlic paste (optional)
1 large sized onion, sliced
1 inch cinnamon
3-4 green cardamom
3 cloves
1 cup curd/yogurt
Salt
Sugar - 4 to 5 teaspoons

For the Garnish:
1 small onion, thinly sliced and fried - also known as birista
½ cup fried cashew nuts (optional)

Procedure:

To make the Bouquet Garni:
1. Take all the ingredients mentioned above for the yakhni in a muslin cloth. Tie the muslin cloth securely with the spices inside it. this is the bouquet garni.

Preparing the Yakhni:
1. Heat 5 cups of water. add the chopped veggies and salt. and the Bouquet Garni
2. Cook the veggies till they are half done. (15 mins)
3. Squeeze the bouquet garni and discard away the spices.
4. Through a strainer strain the stock/yakhni and keep the veggies aside.

Preparing the Pulao:
Placing the final Rice-Vegetable Mixture
in the Rice Cooker with the Yakhni/Stock

1. Heat Ghee in a Pan/Wok
2. Add the caraway seeds and fry till they sizzle.
3. Add the sliced onions and fry them till they are browned.
4. Add the other whole spices - cloves, cinnamon, cardamom along with the ginger garlic paste.
5. Fry for a minute or till the raw smell of the ginger garlic disappears.
6. Now add the half cooked veggies and curd.
7. Mix everything add Salt and Sugar (We have already added salt to the yakhni. keep this in mind before adding the salt)
8. Add the drained basmati rice and mix the rice with the spices and curd.
9. Now pour 3.25 cups of the broth/yakhni. ( I did the last part in the Rice Cooker) and set to boil
10. Put the Mixed Rice in the boiling yakhni.
11. Mix well and cover.
12. Cook for 15-20 minutes or till it switched over to 'Keep Warm' mode
13. Garnish with fried onions and fried cashew nuts.
14. Serve Veg Yakhni Pulao Hot with Onion- Tomato Raita.

And so the Bongs enjoyed a scrumptious Sunday Lunch while remembering the good old days.. You can try the Pilaf with Mutton or Chicken.. I ll keep it for next time!! Thanks for reading! Ciao! :) :)
The Veg Yakhni Pulao with some Onion-Tomato Raita (and ofcourse N is frying the Kabargahs while I click this)


Wednesday, April 8, 2015

My first-ever Flight Journey and Baked Beans

Hiii..

I did most of my schooling in Delhi (except a couple of years in between which was in Kolkata).. At our Delhi school, The School's Foundation day (known as the "School Birthday" in our case) was celebrated in a grand way..Every class had their own party with food and music and colourful dresses.. The class was divided into various groups and each group was allocated a specific food item that they were supposed to get from home, like a group was given Sandwiches, while another was given Fruit Chaat and so on..On one such School Birthday (I was in Grade 4 or 5) a girl in my class M got a particular food item for everyone in the class.. It was 'Canapés' topped with baked beans and grated cheese.. It was so delicious that I still savour the taste..At that time I hardly knew what was Baked Beans..

When I was thirteen, Baba got posted to Kolkata for a couple of years.. Since A(elder sis) had her board exams she had to stay back for a couple of months more with Maa.. Baba went to Kolkata beforehand to arrange for my school admissions .. And suddenly one day after A and Me got back from school Baba calls up Maa to tell her that she needs to pack up my things and send me immediately to Kolkata in a couple of days for a school interview. I was devastated, I was having to leave my city, my school, my friends for thirteen years and go to a new city..my obvious reaction , I started crying..

In two days, with a heavy heart I was boarding my FIRST FLIGHT ever all alone early in the morning.. Maa and A had to stay back because of A's exams..Baba would be there at the airport in Kolkata to pick me up..
It was an Indian Airlines flight (That time we had Indian Airlines) and they used to serve meals during the flight.. I was sitting by the window, having weird feelings.. On one hand I was sad and scared, on the other little bit excited because it was my first ever flying experience..

In a while they served us Breakfast.. As I open up the wrappers what do I see.. Yes ofcourse there was BAKED BEANS..Wow I mean even the airlines people are wanting to cheer me up!!

And eighteen years from then, Baked Beans still cheer me Up.. And flight journeys still scare me.. So Here is my take on the dish... I have modified it slightly according to my palate but trust me it turned out DELICIOUS!!

BAKED BEANS ON TOAST


Baked Beans on Toast
Rajma / Kidney Beans

Makes: Around 7-8 Toasts

Note: The Rajma/ Kidney Beans needs to be soaked in water overnight

Ingredients:

Kidney Beans / Rajma - 200gms (soaked overnight in 3 cups of water)

Onion - 1 large finely chopped


Garlic - 7-8 cloves minced


Tomato Ketchup - 150gms/ 2/3rd Cup
After Soaking overnight

Soya Sauce - 1 teaspoon

White Vinegar - 1 teaspoon

Brown Sugar - 3 teaspoons (you can use white too)

Refined Oil - 2 tablespoons

Salt - to taste

Red Chilli Powder - 1/2 teaspoon 


Black Pepper Powder - 1/2 teaspoon
Preparations
Onions and Garlic being Sautéed

Cumin/Jeera Powder - 3/4 teaspoon 
Processed Cheese - 2-3 Cubes (Grated)

Bread - 8 slices

Butter


Procedure:

1. Soak the Rajma/ Red Kidney Beans in water overnight

2. Pressure Cook the Rajma the next morning  in 3 cups of water ( Till totally Soft that is 13-14 minutes after the 1st Whistle)

3. In a Pan heat the Refined Oil ( 2 tablespoons)

Add the Boiled Rajma
Toast the Bread Slices
4. Add the chopped Onions and Saute

5. Add the minced Garlic and Saute

6. Add Salt, Brown Sugar, Soya Sauce, Vinegar and Mix

7. Add the Tomato Ketchup and Keep stirring.

8. Now add the Boiled Rajma along with half of the Water in the cooker

9. Mix well and add the Red Chilli Powder, Black Pepper Powder, Cumin Powder and some more salt if needed. Let it simmer

10. You can add some more water but the final consistency should be like a thick sauce.

11. Toast the Bread slices (Make them crisp) and lightly butter them.

12. Just before serving Top the bread slices with the Baked Beans and garnish with grated Cheese. 

Serve Immediately or else the bread will turn soggy.


Baked Beans

P.S: Usually 'Baked Beans' is associated with Flatulence but thankfully  I have never had such an experience, so you too can try this without the fear of any public embarrassment (LOL)

Byeee for now and Thanks for taking out time to read!