Showing posts with label main-course. Show all posts

Sunday, December 27, 2015

The Yummiest Malai Kofta Curry

Malai Kofta Curry
Hii..
Being a Bengali I am a die-hard non-vegetarian..Yes from Fish, Lamb to Prawns and Crabs, I am crazy about anything non veg. But still there are a few Vegetarian dishes which make me drool and one of them is Malai Koftas..Yes these soft Paneer Koftas in a smooth creamy gravy always makes me drool..I have had these at some wedding or at someone's place but never tried my hand at it looking at the cumbersome process.. But one fine day I decided no I really need to try this and to my surprise it wasn't that much of an Herculean task, in fact I was done in an hour. (I have taken the recipe from a site 'Veg Recipes of India'

Note: The two highlights of this dish is that the Koftas should be really soft, melt-in-the-mouth and the gravy shouldn't be very oily and spicy..just a smooth creamy light flavoured gravy.Thankfully I could fulfil both the points on my first trial.

MALAI KOFTA CURRY

Makes: Around 24 Koftas (For 8 people)

Ingredients

For the Koftas


    400 gms paneer/cottage cheese, grated
    3 medium size potatoes, boiled, peeled and mashed
   1/2 tsp red chili powder/lal mirch powder
    2 tablesps cornflour
    1/2 teasp garam masala
    2 tablesps chopped coriander leaves
    Salt as required
    Raisins - 60 pcs
    Refined Oil for frying the Koftas

For the Gravy/Curry:


    3 large Onions (paste)
    200 gms cup Tomato Purée
    25-30 Cashewnuts soaked in warm water for 30 minutes and then blended to a smooth paste
    1/2 tsp Turmeric powder
    3/4 tsp Red chili powder/lal mirch powder
    2 inch Ginger/adrak - 8-10 Garlic cloves/lahsun - made in to a fine paste
    1/2 tsp Garam masala
    4 cups water
    2 tsp kasuri methi/dry fenugreek leaves
    Salt as required
   Sugar as required (optional)
   Refined Oil
   200 ml Fresh Cream
  Whole spices/garam masala :1 bay leaf/tej patta, 1 inch cinnamon/dal chini, 1 or 2 black cardamom/badi elaichi, 2-3 green cardamom/hari elaichi or choti elaichi, 2-3 cloves/laung

Procedure1. Mix all the ingredients mentioned under kofta ingredient list except oil in a bowl.

Combining the ingredients for the Koftas


2. Take a portion of the mixture, flatten it in your palm and place 2-3 raisins then bind it into medium sized balls.


Binding the Balls

3. Fry the koftas in medium-hot oil till golden. Keep aside.
Frying the Koftas


4. In another wok, add 2 tablespoons of Refined Oil and add all the whole spices and fry till the oil becomes fragrant.

Preparing the Gravy

   
5. First add the onion paste and brown it.Now add the ginger-garlic paste and fry for some seconds till the raw aroma of the paste goes away.

6. Add the turmeric powder, red chili powder, garam masala powder and Sugar(if required) and saute.

7. Add the Tomato Puree and mix further and fry till the oil separates from the masala.
Left: Tomato Puree --------------------------Right:Cashewnut Paste
8. Add the Cashewnut paste and mix well.

9. Add the water, mix and cover the wok and let it simmer

10. While it is simmering add the Salt.

Gravy almost done

11. Add the Kasoori Methi leaves and the fresh cream (keep aside 2 tablespoons of cream for garnish)

12. As the gravy thickens switch off the flame

13. In a bowl place the Koftas and pour the gravy over it. Garnish with Fresh Cream and coriander leaves.

14. Serve Hot with Naan or Roti.

Tips: While combining the ingredients for the koftas, initially add the given amount of cornflour and make a small ball and fry it in hot oil. If the ball doesnt retain its shape and breaks down then add a little more cornflour to the kofta mixture an test again. Try not to put extra cornflour as it will spoil the texture of the Koftas, put just enough so that the koftas hold together while frying.

Bon Appetite
Thanks for reading!! Ciao!


Monday, December 21, 2015

Winter Evenings and a One-Pot Meal (Vegetable Noodle Soup Bowl)

VEGETABLE NOODLE SOUP - ONE POT MEAL

Hi.. I Love Winters-"Period" ..probably because the dreamer in me feels more enthusiastic in this weather.. And when it comes to food then all the fresh colorful vegetables available in winters always make me smile!
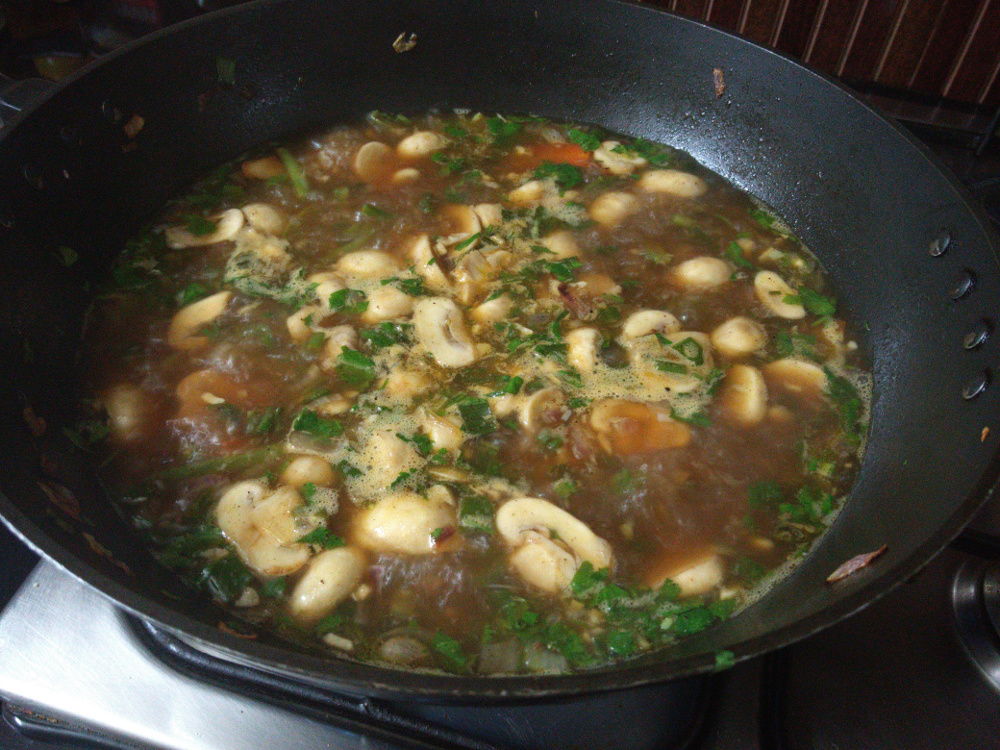
One such winter evening when me n N felt like having something simple yet yum, that is when this idea popped into my head..Why not turn all the vegetables in the refrigerator into something so perfect for a cold winter night..So here it is..A warm tasty ONE POT MEAL - VEGETABLE NOODLES SOUP BOWL. This is an extremely simple healthy and delicious full meal.
P.S: If you have chicken available in your fridge you can add boiled shredded chicken to it.

ONE POT MEAL - VEGETABLE NOODLE SOUP
Makes: Four bowls


Ingredients
Colorful Veggies

Button Mushroom: 300gms
Beans : 50gms
Carrots: 2 large
Spring Onions - 6 stems

Onion - 1 medium
Garlic - 5 -6 cloves
Ginger -  2" piece
Butter - 1 tablespoon
Refined Oil - ! tablespoon
Salt - to taste
Black Pepper Powder - 1 tsp
Soya Sauce - 1 tsp
Vinegar - 1tsp 

Red Chilli Sauce 1.5 tsps
Tomato Sauce 1.5 tsp
Lemon Juice - 1 tablespoon
Coriander leaves - 2 tablespoons
Ajino Moto - 1/2 tsp (optional)
Boiled Egg - 2 (optional)
Noodles - 200gms
Sugar - 1tsp
Water/vegetable stalk - 6-7 cups
Preparations


Procedure

1. Chop the Onions, Spring Onion Whites and Green and the Coriander leaves

2. Slice the Mushrooms, Carrots and Beans

3. Mince the Ginger and Garlic

4. Boil the noodles and drain the water and keep aside


5. In the same pan, Heat the butter and oil and stir in the Ginger and garlic, add the chopped onions and spring onion whites and stir

6. Add the mushrooms, carrots and beans and stir well.

7. After a few minutes and the chopped spring onion greens (keeping aside 1 tablespoon for garnish), stir well

8. Add the Salt, Sugar, Black Pepper Powder and Ajiono Moto (optional) and stir.

9. Add the sauces and mix well

10. Add the water/stalk and cover and let it simmer


11. Cook for around 10 minutes

12. When the vegetables looks done..Add the Lemon Juice and Coriander Leaves

13. In a bowl add some boiled noodles and pour some soup and vegetables over it. Garnish with spring onion greens and Sliced Boiled Egg.

Serve HOT!!!

Enjoy your ONE- POT MEAL!!!

Ready


Sunday, July 12, 2015

Sunday Lunch with Veg Yakhni Pulao/Pilaf

Veg Yakhni Pulao/Pilaf
Since I was a child Sunday Lunch used to always be special.. Being a Bengali, Maa's favourite used to be Mangsho Bhaat as in Mutton Curry and Steamed Rice... Arpi (sis) and me used to finish off with our homework right in the morning and then kept playing till Maa's Mutton Gravy's aroma made our tummies growl with hunger and our mouths drool..
Many years have past and Maa still continues to make something special on Sunday and makes me miss her even more on these days..

Today being a Sunday, the Husband n Me decided to move our lazy bones and do something special with Rice and Mutton..

N (the husband) chose a Kashmiri dish - Mutton Kabargah (for the recipe click here), his patented dish which I am crazy about.. I decided to make a type of Kashmiri Pulao/Pilaf to go with it which I have never tried before..After browsing through the net I found a very interesting recipe. It was Veg Yakhni Pulao (adopted from http://www.vegrecipesofindia.com/vegetable-yakhni-pulao-veg-yakhn-pulao/)..Since we Bongs like our Pilafs slightly sweet, I added some sugar in the recipe. This one's extremely light on the palate yet very flavourful!! Hope you all like it!
Getting Started


Note: Yakhni means Stock in Kashmiri. Here the Rice is cooked in the vegetable stock, You can try this with Mutton or Chicken also.
Bouquet Garni refers to a bundle of herbs/spices tied together in a muslin cloth and placed in the pan of water with the vegetables/meat to enhance the flavour of the stock.

VEG YAKHNI PULAO / PILAF

Makes: 6-7 servings
Bouquet Garni

Ingredients

For the Bouquet Garni:
3-4 strands of mace
1 tbsp coriander seeds/dhania
½ tbsp caraway seeds/shah jeera
3 cloves/laung
2 inch cinnamon/dalchini
¼ tsp nutmeg/jaiphal
½ tbsp chopped ginger garlic

For the Veg Yakhni:
2-3 cups chopped veggies like cauliflower, carrots, beans, peas
5 cups water
salt

For the Pulao/Pilaf:
Vegetables chopped up

3 or 4 tbsp ghee
2 cups basmati rice, soaked for 30 minutes
1 tsp caraway seeds/shah jeera
1 tsp ginger garlic paste (optional)
1 large sized onion, sliced
1 inch cinnamon
3-4 green cardamom
3 cloves
1 cup curd/yogurt
Salt
Sugar - 4 to 5 teaspoons

For the Garnish:
1 small onion, thinly sliced and fried - also known as birista
½ cup fried cashew nuts (optional)

Procedure:

To make the Bouquet Garni:
1. Take all the ingredients mentioned above for the yakhni in a muslin cloth. Tie the muslin cloth securely with the spices inside it. this is the bouquet garni.

Preparing the Yakhni:
1. Heat 5 cups of water. add the chopped veggies and salt. and the Bouquet Garni
2. Cook the veggies till they are half done. (15 mins)
3. Squeeze the bouquet garni and discard away the spices.
4. Through a strainer strain the stock/yakhni and keep the veggies aside.

Preparing the Pulao:
Placing the final Rice-Vegetable Mixture
in the Rice Cooker with the Yakhni/Stock

1. Heat Ghee in a Pan/Wok
2. Add the caraway seeds and fry till they sizzle.
3. Add the sliced onions and fry them till they are browned.
4. Add the other whole spices - cloves, cinnamon, cardamom along with the ginger garlic paste.
5. Fry for a minute or till the raw smell of the ginger garlic disappears.
6. Now add the half cooked veggies and curd.
7. Mix everything add Salt and Sugar (We have already added salt to the yakhni. keep this in mind before adding the salt)
8. Add the drained basmati rice and mix the rice with the spices and curd.
9. Now pour 3.25 cups of the broth/yakhni. ( I did the last part in the Rice Cooker) and set to boil
10. Put the Mixed Rice in the boiling yakhni.
11. Mix well and cover.
12. Cook for 15-20 minutes or till it switched over to 'Keep Warm' mode
13. Garnish with fried onions and fried cashew nuts.
14. Serve Veg Yakhni Pulao Hot with Onion- Tomato Raita.

And so the Bongs enjoyed a scrumptious Sunday Lunch while remembering the good old days.. You can try the Pilaf with Mutton or Chicken.. I ll keep it for next time!! Thanks for reading! Ciao! :) :)
The Veg Yakhni Pulao with some Onion-Tomato Raita (and ofcourse N is frying the Kabargahs while I click this)


Tuesday, July 7, 2015

Oh Calcutta and Bhapa Ilish


Maa and Me
Well all of you will agree there is something about 'Maa ke haath ka khana' and that is what makes my annual vacation to Calcutta even more special..

Being born and brought up in Delhi I really haven't spent many years in Calcutta (except a couple of years of schooling).. But there is something so very special about that city that once you manage a bite of the place you will savour the flavours forever..

After Baba's retirement, Maa and Baba mostly stay in Calcutta which gives me good enough reason to visit the city atleast annually.. Its a city full of amusing things, from lip-smacking street food to the hand pulled rickshaws, from the yellow cabs to the slow moving trams, the city is a wonder in itself!!!

And for me additionally is Maa, Baba, Arpi , Jiju n my cute nephew!! Obviously whenever I am there Maa makes sure she prepares all my favourite dishes!!

'Ilish' or 'Hilsa' is one Unique Fish...and being a Bong I totally love its taste..And if you manage to get hold of a fresh Hilsa make sure 'Bhapa Ilish' is the 1st thing that you cook..Maa obviously made sure I got my annual share of Hilsa this summers too. So here's presenting Maa ke haath ka 'Bhapa Ilish' or 'Steamed Hilsa'

BHAPA ILISH / STEAMED HILSA FISH

Fresh Hilsa Fish


Makes: 6-7 pieces of Fish
Fresh Mustard and Green Chilli Paste

Ingredients

6-7 pieces of freshly cut Hilsa
2 tablespoons of fresh Yellow Mustard  and Green Chilli Paste
2 teaspoons mustard oil
2-3 green chillies (slit)
Salt

Procedure

1. Wash the Hilsa pieces and sprinkle Salt and keep aside for half an hour

Preparation
2. Take a metallic container (with lid) which fits perfectly into the pressure cooker add the Mustard Oil, the Mustard and Chilli paste and some Salt

3. Put the pieces of fish inside and properly smother the mixture over the fish


4. Place the green chillies over the pieces
5. Close the lid and pressure cook till you hear one whistle then switch it off

6. When the pressure has released Serve Hot with some steamed Rice


This is one of the most popular Bengali Meals ever..Just one things you need to be an expert at picking out fish bones while eating Hilsa!


Bhapa Ilish / Steamed Hilsa Fish
Bon Appetite and Thanks Maa for making my annual trips so very memorable!

Sunday, May 3, 2015

My Marriage at 21 and Mutton Kalimiri

Our Wedding
Hii..
I was just now reading a post on Facebook which talks about the usual stereotypes associated with an Indian Marriage. Like the girl should know how to cook, the girl should dress in a certain way after marriage, whether the girl should work after marriage, what about her male friends and so on..

I got married when I was 21 and not because of some social/parental pressure but because I had found that one person with whom I wanted to spend the rest of my entire life. I was still doing my Masters and honestly at 21 I hardly understood all the things associated with marriage. It was more of a 'dream come true' feeling because I was head over heels in love with N(hubby)..

But now (its been around 10yrs) when I read all this I can't thank my stars enough that I had N in my life and nobody else. The main reason being from the beginning till now N loved me the way I am..Never ever did he burden me with expectation of any sorts. I could be MYSELF in front of him ALWAYS.. I really don't know how the usual Husband-Wife relationship is cause N and Me have always been Best of Friends from the very beginning.

Its more like two friends who are in love with each other are staying together. All responsibilities together and all the fun together but giving each other sufficient space to do our own thing too, to have my own set of friends, to do things what I want to do the way I want to do!!!!

Well Thank You N, Thank you for making me feel that getting married that early wasn't an impulsive decision which one would regret later, rather something which I will cherish all my life and even later!!! Thanks for being on my side from being a total no-cook person to someone who writes a food blog now!

Now coming back to FOOD..Yes by now you can gauge that I didnot cook this one but N did.. Its called MUTTON KALIMIRI/ BLACK PEPPER LAMB. I have taken this from the Internet. Its a recipe by Chef Harpal Singh

MUTTON KALIMIRI/ BLACK PEPPER LAMB


Mutton Kalimiri / Black Pepper Lamb

Makes : 6-7 servings

Ingredients
1 kg Mutton (with Bones)
Mutton
1.5 tablespoons Freshly Crushed Black Peppercorns
4 tablespoons Ghee/refined Oil
1” Cinnamon – 2 pcs
2 Bay Leaves
7-8 Green Cardamom
5 Black Cardamom
5 Green Chillies – Slit
6 Medium Onions Sliced
3 tablespoons Ginger-Garlic Paste
Salt to Taste
5 tablespoons Boiled Cashewnut paste
1.5 teaspoons Garam Masala Powder
1/2 Cup Fresh Cream

Procedure

1. Heat 3 tablespoons of Oil/Ghee in a Non-stick Pan and add the Cinnamon Bay 
Getting Started
Leaves Green Cardamom Black Cardamom Green Chillies and Sauté
2. Add the sliced Onions and Sauté for 3-4 minutes
3. Add the Mutton and Sauté for 2-3 minutes
4. Add the Ginger Garlic Paste, Mix and Sauté for 3-4 minutes
5. Add Salt and Mix Well
6. Add 2 Cups of Water and Pressure Cook on High for 5 minutes and then reduce heat and cook for 25-27 minutes
7. Heat the remaining Ghee/Oil in a non stick pan
8. Add the crushed Peppercorns and Cashew Nut paste and Sauté for 3-4 minutes (till it forms a lump)
9. Reduce Heat and add the cooked Mutton with the stock and spices
10. Add Garam Masala, Mix well and Cook further
Cashew nut paste and Black Pepper being sautéed

11. Add the Fresh Cream and Mix well, Cook further till it gets heated properly.
12. Sprinkle some more Crushed Pepper and Serve Hot with Naan or Roti.

This recipe has very delicate flavours and those who are not fond of Mutton, can try out with chicken.
Note: Vegetarians: Try with Paneer/Cottage Cheese

Thank You for reading..Ciao!

Mutton Kalimiri


Sunday, April 12, 2015

When 'Cooking' was a far fetched idea - Piquant Chicken Legs

Hii...

Years ago.. Yes I am the younger one who looks like a complete nut-case
Bengali parents are always very particular when it comes to Studies (Pora-Shuna) and Extra-curricular activities. Well so were mine. 
A (sis) was the perfect all rounder child every Bong parent would want. She was great in studies, an amazing elocutionist, amazing leadership qualities and obviously the teacher's favourite. And  Me, Ahem obviously the opposite, Yes I was great with 'talking' but that was mostly during the classes when the teacher was trying to teach, for me Sports was not playing a particular sport and excelling in it but rather jumping and running around. Whenever A was on 'Prefect' duty in the school corridors, she mostly used to find me outside the class or outside the headmistress's office 'PUNISHED'. But she was my greatest Saviour too. Never ever did she go and complain to Maa or Baba about her naughty little sis.

At Home, we were always occupied with either studies or some fun activities. In our house, kids doing any 'ghar ka kaam' was a strict no-no. It used to be always managed by Maa and Baba. (Though we had to polish our own shoes :( hehe ).

My Nani had been unwell from a young age so my Maa had to take up the kitchen responsibilities at an extremely tender age, She used to manage her studies and the household work since she was twelve. So Maa had been VERY particular that neither A nor Me should start cooking or do any household tasks until we grew up enough or felt like doing it ( Well I am 31 now and A is 35 and Maa still doesn't let us do so technically we are still not grown up enough) hehe.. But that is how 'Mothers' are!!

But what I used to love then also (though I didnot cook) was watching cookery shows. A and me used to always fight over the remote cause she wanted the HBO and I wanted some cookery show. On one such day (when I won the fight) I saw this dish being prepared by Chef Sanjeev Kapoor and it was so simple that even a novice like me could cook this for everyone at Home and Maa Baba and A loved it!!

You can say this was my Début Match in Cooking.. Though my next cooking trial was after 5-6 years I guess!!!

So here goes the Recipe:

PIQUANT CHICKEN LEGS                                
Makes: 4-5 servings

Ingredients:  
Ingredients
Chicken Legs - 16 pieces
Orange Juice - 1.5 cups
Chilli Flakes - 1 teaspoonful
Black Pepper- 1 teaspoonful
Lemon Juice- 3 tablespoons
Cornflour - 1 tablespoons
Honey - 3.5 tablespoons
Salt - to taste

Procedure:

1. Marinate the Chicken with the Orange Juice and some salt for about 15-20mins
2. After 15 mins take out the chicken legs and keep aside
3. In a saucepan pour the Orange Juice (from d marinade) and reduce it over heat
4. Add the chicken pieces and cover and let it cook
5. When the chicken is almost done add the Chilli Flakes, Black Pepper, Honey, Lemon Juice and Salt (if reqd)
6. Mix well and cook further.
Almost Ready

7. When the chicken looks done, mix the cornflour with half a cup water and pour it into the saucepan.
8. Let it simmer till it reaches a sauce like consistency.
9. sprinkle some more black pepper and serve hot!

P.S: The flavors are a combination of tangy, sweet and hot !


This is still one of my favourites and if you notice there is NO-OIL in the recipe so technically very healthy too yet extremely unique and delicious. Try It!!
Thanks and see you in my next post!
Piquant Chicken Legs


Tuesday, April 7, 2015

No Time for Lunch - Lemon Rice

Hii..
Remember I told you in my last post that both me n N are WFH (Work From Home) people..and I had mentioned a zillion advantages but one disadvantage is that we are never on a fixed schedule even when it comes to food..
There are days when both of us are so busy working our bums off that none of us go to the kitchen timely to cook..

So this was one of those days..it was 1 pm and we realised that there is nothing ready for lunch.. A tempting solution was to call up a Pizza guy but then it can't happen everyday..so I quickly wrack my brains to find a quick fix and I got a brainwave 'Ting'.. Lets make LEMON RICE aka Pulihora (Please correct me)..

Thankfully we have a Vegetable Store inside our building complex.. so I throw the car keys and a list towards N (Yes we are too lazy to walk down hehe) to go and get the stuff while I boil some rice.

Its a simple yet tasty recipe when you want some quick lunch.. We usually club it with some Raita and Roasted Papad..

LEMON RICE / PULIHORA AND RAITA


Lemon Rice with Raita

Makes: 3-4 servings

Ingredients:

Rice - 1.5 cup

Preparations
Peanuts - 2 tablespoons

Coconut (freshly grated/scraped) - 1 cup (Half the Medium Coconut)


Juice of 1 Big Lemon

Turmeric Powder / Haldi - 1/2 teaspoon

Sugar - 4 teaspoons

Salt - to taste

Curry Leaves - 5-6

Black Mustard Seeds - 1/2 teaspoon

Dried Red Chilli - 1

Chana Daal - 1 teaspoon

Urad Daal - 1 teaspoon


Refined Oil - 4-5 teaspoons

Procedure:

1. Firstly Boil the Rice in sufficient water and Drain the excess water (Note: Don't over boil) . Keep the rice to cool slightly
2. Scrap the Coconut.
Rice and Roasted Peanuts
3. In a Kadhai take 2 teaspoons of refined Oil and saute the peanuts till brown and crispy. Mix the Peanuts with the Rice.
4. In the Same Kadhai heat some more Oil (2-3teaspoons).
5. Add the Mustard Seeds, Once they start spluttering add the Haldi, Chana Daal, Urad Daal and the Curry Leaves, Saute for a few seconds
6. Now add the Grated Coconut and Mix for 1/2 a minute
7. Mix the entire coconut mixture with the Rice.
8. Add Salt, Sugar and Lemon Juice to the Rice and Mix Well
9. Garnish with Scraped Coconut and Serve with Raita and Roasted Papad

Lemon Rice


Raita
1. Beat the Dahi/Yogurt till it looks totally smooth
Raita

2. Add Salt, Rock Salt, Sugar, Black Pepper Powder, Roasted Jeera Powder and Mix Well
3. Add finely chopped Onion, Tomato and Coriander Leaves (Dhania) and Mix. Serve Chilled.

So finally me n N got something decent to eat in a jiffy.. and then what..then back to our respective computers to finish our work...

P.S: Since we both prepared it together it was done in less than half hour otherwise it will take slightly more time.. But still a pretty quick thing to do!!

Ciao n thanks for reading!!