Tuesday, December 29, 2015

A No-Bake Nutella Cheesecake

No-Bake Nutella Cheesecake
Hii..
Who doesn't love a Cheesecake..Its something which can make you smile even on a bad day..Well personally I prefer the No-bake ones to the baked ones..Simply cause I find the flavours and texture more endearing..I usually keep making cheesecakes for some special occasions..But I fine day I was really craving for one so even though there was no special reason I made one and OMG was I happy or was I happy!!
Well I didnot use Cream Cheese here and simply substituted it with some ingredients like cottage cheese, fresh cream and condensed milk (since these were readily available).
I was also craving for some hazelnut chocolate so I decided to incorporate that flavour in the Cheesecake itself. So here goes my Nutella Cheesecake

NO-BAKE NUTELLA CHEESECAKE (EGGLESS)}

Ingredients
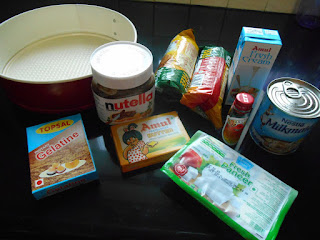
Ingredients


For the base
Biscuits - 25-30 digestive biscuits  (or any chocolate biscuit)
Butter - 80 gms

For the cheesecake layer
Paneer (Cottage Cheese) - 200 gms
Condensed milk - 1 tin (400 ml) I used milkmaid
Fresh cream - 200 ml (I used Amul fresh cream)
Nutella Jar - 350 gms
Vanilla extract - 1 tsp
Gelatin - 2 tbsp
Water - 1/2 cup
Salt - 1/4 tsp

Method

Preparation
1. Butter the bottom and sides of an 8 inch springform pan.
2. If you don't have a springform pan, use your normal cake pan or a tart pan. Line the regular cake pan with a clingfilm or aluminium foil. Line the bottom and sides together without cutting the clingfilm so that you can easily lift the cheesecake out when it's set.
3. Add the gelatin to half cup of water and mix. Set aside for 5 minutes to bloom. Microwave for 30 seconds or heat it in a saucepan for 30 seconds and let it cool. it will become a clear solution. Let it cool.

Preparing the Base

FOR THE BASE
1. Take the largest jar of your blender and add crumbled biscuits in it and process to a fine powder and transfer to a bowl.
2. Melt the butter and add it to the biscuit powder and mix well.
3. Transfer this biscuit mixture to the base of the pan and press well. Refrigerate it until we finish the next step.

Preparing the Cheesecake Layer

FOR THE CHEESECAKE
1. Grate or chop the paneer and add it to a blender. Add the condensed milk and fresh cream and blend till smooth.
2. Now add the vanilla extract, and salt. Blend again.
3. Add the entire Nutella spread and blend again till it's smooth and creamy.
4. Transfer to a bowl. Add the cooled gelatin and mix well.
5. Bring the springform pan from the refrigerator and pour the chocolate mixture over the biscuit base layer.
6. Tap once to remove the air bubbles. Cover and refrigerate until set.
7. Let it set for atleast 4 hours. (I did it overnight)
8. Remove the springform pan slowly and decorate as you wish.

Enjoy

Sunday, December 27, 2015

The Yummiest Malai Kofta Curry

Malai Kofta Curry
Hii..
Being a Bengali I am a die-hard non-vegetarian..Yes from Fish, Lamb to Prawns and Crabs, I am crazy about anything non veg. But still there are a few Vegetarian dishes which make me drool and one of them is Malai Koftas..Yes these soft Paneer Koftas in a smooth creamy gravy always makes me drool..I have had these at some wedding or at someone's place but never tried my hand at it looking at the cumbersome process.. But one fine day I decided no I really need to try this and to my surprise it wasn't that much of an Herculean task, in fact I was done in an hour. (I have taken the recipe from a site 'Veg Recipes of India'

Note: The two highlights of this dish is that the Koftas should be really soft, melt-in-the-mouth and the gravy shouldn't be very oily and spicy..just a smooth creamy light flavoured gravy.Thankfully I could fulfil both the points on my first trial.

MALAI KOFTA CURRY

Makes: Around 24 Koftas (For 8 people)

Ingredients

For the Koftas


    400 gms paneer/cottage cheese, grated
    3 medium size potatoes, boiled, peeled and mashed
   1/2 tsp red chili powder/lal mirch powder
    2 tablesps cornflour
    1/2 teasp garam masala
    2 tablesps chopped coriander leaves
    Salt as required
    Raisins - 60 pcs
    Refined Oil for frying the Koftas

For the Gravy/Curry:


    3 large Onions (paste)
    200 gms cup Tomato Purée
    25-30 Cashewnuts soaked in warm water for 30 minutes and then blended to a smooth paste
    1/2 tsp Turmeric powder
    3/4 tsp Red chili powder/lal mirch powder
    2 inch Ginger/adrak - 8-10 Garlic cloves/lahsun - made in to a fine paste
    1/2 tsp Garam masala
    4 cups water
    2 tsp kasuri methi/dry fenugreek leaves
    Salt as required
   Sugar as required (optional)
   Refined Oil
   200 ml Fresh Cream
  Whole spices/garam masala :1 bay leaf/tej patta, 1 inch cinnamon/dal chini, 1 or 2 black cardamom/badi elaichi, 2-3 green cardamom/hari elaichi or choti elaichi, 2-3 cloves/laung

Procedure1. Mix all the ingredients mentioned under kofta ingredient list except oil in a bowl.

Combining the ingredients for the Koftas


2. Take a portion of the mixture, flatten it in your palm and place 2-3 raisins then bind it into medium sized balls.


Binding the Balls

3. Fry the koftas in medium-hot oil till golden. Keep aside.
Frying the Koftas


4. In another wok, add 2 tablespoons of Refined Oil and add all the whole spices and fry till the oil becomes fragrant.

Preparing the Gravy

   
5. First add the onion paste and brown it.Now add the ginger-garlic paste and fry for some seconds till the raw aroma of the paste goes away.

6. Add the turmeric powder, red chili powder, garam masala powder and Sugar(if required) and saute.

7. Add the Tomato Puree and mix further and fry till the oil separates from the masala.
Left: Tomato Puree --------------------------Right:Cashewnut Paste
8. Add the Cashewnut paste and mix well.

9. Add the water, mix and cover the wok and let it simmer

10. While it is simmering add the Salt.

Gravy almost done

11. Add the Kasoori Methi leaves and the fresh cream (keep aside 2 tablespoons of cream for garnish)

12. As the gravy thickens switch off the flame

13. In a bowl place the Koftas and pour the gravy over it. Garnish with Fresh Cream and coriander leaves.

14. Serve Hot with Naan or Roti.

Tips: While combining the ingredients for the koftas, initially add the given amount of cornflour and make a small ball and fry it in hot oil. If the ball doesnt retain its shape and breaks down then add a little more cornflour to the kofta mixture an test again. Try not to put extra cornflour as it will spoil the texture of the Koftas, put just enough so that the koftas hold together while frying.

Bon Appetite
Thanks for reading!! Ciao!


Thursday, December 24, 2015

And Since its Christmas - Easy Light Fruit Cake

Its Christmas

Hii..
One of the major advantages of being born and brought up in Delhi (and also in a Colony for Government officials) is that we get to interact with such a variety of people from all over India.. There is never a dull or repetitive moment throughout the year because one of your neighbours is always celebrating some festival and you too get to participate.. I still remember gorging on Mithai's at my Punjabi friend's house on Diwali, celebrating Dashami with a grand dinner at a fellow Bengali neighbour, savouring delicious Mutton on Eid at a Muslim friend's place and so on..
Every festival became an integral part of our lives..And on Christmas, Baba and Maa used to make sure we get to eat the yummiest cakes at home or from the market!!

And thankfully me n N also make sure we continue with the tradition of enjoying as many festivities as possible..So this year I decided we are not going to buy a plum cake for Christmas instead I ll bake a Fruit Cake at Home. Yes and I did just that and believe me the reaction on N's face when he took the first bite was totally worth it!

Christmas Cakes usually requires weeks of effort but as you know the lazy bones that I am I couldn't imagine putting in that much effort. And the internet has something for everyone's needs, so I found this recipe in 'Joy of Baking' for a light fruit cake which can be baked and savoured on the same day.

So this Christmas is definitely extra special for us cause I baked my 1st Christmas Cake..here goes the recipe


LIGHT and EASY FRUIT CAKE

Makes
: 1 Loaf ( 9 x 5 x 3 inches Cake)

Ingredients

1 cup (200 grams) candied red or green cherries/tooti frooti (cut into quarters)

1/2 cup (50 grams) raisins

2-3 tablespoons 
rum, brandy, or sherry (optional)

1/2 cup (120 grams) unsalted butter, room temperature

2/3 cup (120 grams) granulated white sugar

3 large eggs, room temperature

1 teaspoon pure vanilla extract

1 1/2 cups (195 grams) all-purpose flour

1/2 cup (50 grams) ground almonds (almond meal/flour)

20 sliced almonds

1 teaspoon baking powder

1/4 teaspoons salt

Zest of one small lemon (outer skin)

1/4 cup (60 ml) milk (whole or reduced fat)

NOTE: If desired, in a bowl combine the candied cherries, and raisins. Stir in the alcohol, cover, and let sit at room temperature at least a day (up to two days). Stir occasionally.


Procedure

1. I prepared the Almond Meal/flour at Home. I blanched 50 gms of Almond (boil the almonds uncovered for 2 minutes) then removed the skin and let it dry COMPLETELY for around an hour. Once the almonds are dry then I coarsely ground then into Almond meal. But make sure you donot turn it into almond butter by grinding further.

Almond Meal Preparation


2. In the bowl of your electric mixer, or with a hand mixer, beat the butter (1-2mins)  Add the sugar and beat further until light and fluffy (around 4-5 minutes)


3.Add the eggs, one at a time, beating well after each addition. Scrape down the sides of the bowl as needed. (The batter might looks curdled, need not worry)

Cake Batter Preparations

4. Add the Vanilla Extract into the batter and mix well.

5. Add the candied and dried fruits, along with any juices, and beat until incorporated. Beat in half the flour mixture just until incorporated. Then beat in the milk and then the remaining flour mixture. Donot overmix.

6. When cake batter is ready , preheat oven to 350 degrees F (180 degrees C), with the oven rack in the center of the oven. Butter, or spray with a nonstick vegetable spray, a 9 x 5 x 3 inch (23 x 13 x 8 cm) loaf pan. Place a piece of parchment paper on the inside flat surface and flour the pan.

7. Scrape the batter into the prepared pan and smoothen the top with a knife or spatula and, if desired, decorate the top of the cake with sliced or flaked almonds.

Placing the batter

8. Bake at 180 degrees C for about 60 - 65 minutes or until a toothpick inserted into the center comes out clean. (If you find the cake is browning too much, cover with a piece of aluminum foil.)

9. Remove from oven and let cool on a wire rack for about 10 minutes before removing from pan.

Cooling Off

10. The cake does benefit from being stored a day or two before serving, as this softens the outer crust and allows the flavours to mingle.

Slice it off
Wishing You All a Merry Christmas and a great festive season ahead..Thanks for taking out time to read
P.S: You are welcome to comment and send me tips to improve.


Monday, December 21, 2015

Winter Evenings and a One-Pot Meal (Vegetable Noodle Soup Bowl)

VEGETABLE NOODLE SOUP - ONE POT MEAL

Hi.. I Love Winters-"Period" ..probably because the dreamer in me feels more enthusiastic in this weather.. And when it comes to food then all the fresh colorful vegetables available in winters always make me smile!
One such winter evening when me n N felt like having something simple yet yum, that is when this idea popped into my head..Why not turn all the vegetables in the refrigerator into something so perfect for a cold winter night..So here it is..A warm tasty ONE POT MEAL - VEGETABLE NOODLES SOUP BOWL. This is an extremely simple healthy and delicious full meal.
P.S: If you have chicken available in your fridge you can add boiled shredded chicken to it.

ONE POT MEAL - VEGETABLE NOODLE SOUP
Makes: Four bowls


Ingredients
Colorful Veggies

Button Mushroom: 300gms
Beans : 50gms
Carrots: 2 large
Spring Onions - 6 stems

Onion - 1 medium
Garlic - 5 -6 cloves
Ginger -  2" piece
Butter - 1 tablespoon
Refined Oil - ! tablespoon
Salt - to taste
Black Pepper Powder - 1 tsp
Soya Sauce - 1 tsp
Vinegar - 1tsp 

Red Chilli Sauce 1.5 tsps
Tomato Sauce 1.5 tsp
Lemon Juice - 1 tablespoon
Coriander leaves - 2 tablespoons
Ajino Moto - 1/2 tsp (optional)
Boiled Egg - 2 (optional)
Noodles - 200gms
Sugar - 1tsp
Water/vegetable stalk - 6-7 cups
Preparations


Procedure

1. Chop the Onions, Spring Onion Whites and Green and the Coriander leaves

2. Slice the Mushrooms, Carrots and Beans

3. Mince the Ginger and Garlic

4. Boil the noodles and drain the water and keep aside


5. In the same pan, Heat the butter and oil and stir in the Ginger and garlic, add the chopped onions and spring onion whites and stir

6. Add the mushrooms, carrots and beans and stir well.

7. After a few minutes and the chopped spring onion greens (keeping aside 1 tablespoon for garnish), stir well

8. Add the Salt, Sugar, Black Pepper Powder and Ajiono Moto (optional) and stir.

9. Add the sauces and mix well

10. Add the water/stalk and cover and let it simmer


11. Cook for around 10 minutes

12. When the vegetables looks done..Add the Lemon Juice and Coriander Leaves

13. In a bowl add some boiled noodles and pour some soup and vegetables over it. Garnish with spring onion greens and Sliced Boiled Egg.

Serve HOT!!!

Enjoy your ONE- POT MEAL!!!

Ready


Wednesday, December 16, 2015

Mom-in-Law's recipe for FISH GALOUTI KEBABS

Fish Galouti Kebabs
Hi..
Being a Bengali I absolutely love Fish..Any variety any size.. And when its done as Galouti kebabs what more can you ask for..Even for Fish non-lovers I bet this is one preparation they would die for.. I first had it when I was in school at my then future Mom-in-law's place and it was obviously love at first sight... These melt-in-the-mouth kebabs can be had at any time of the day and trust me if you have one you just CANNOT stop having more..
Post marriage I saw Maa make these a number of times and gradually I managed to try them on my own.. N who isn't that fond of fish still lands up drooling!!


FISH GALOUTI KEBABS

Makes - 25 pieces/kebabs

Ingredients
Fish ( Rohu/Katla  or You can also take Fish Fillets) - 900gms
Potatoes - 3 Medium
Eggs- 1
Onion - 3 medium
Ginger - 2inches
Garlic - 4-5 big cloves or 8-9 small cloves
Salt - to taste
Garam Masala Powder - 1 tsp
Red Chilli Powder - 1 tsp
Refined Oil - to shallow fry
Besan - 2 tablespoons


Procedure
1. Take Water in a Wok and Put the fish pieces in it and Boil the Fish (The Fish pieces should be completely immersed in the water). It will take around 20-25mins. Please check before you remove the pieces if they are cooked or not.

Preparation

2. Remove the fish and place it on a plate.. After it has cooled slightly (not totally but when its warm) , Mash the fish pieces(preferably with hand) and pick out all the bones( if using Fish fillets then then 'bones' step can be avoided). Once the Fish is mashed and all the bones have been removed, Keep aside.

Left- Onion Ginger Garlic | Right - Boiled Mashed Fish
3. Make a paste of the Onion, Ginger and Garlic


4. In a Wok (preferably non-stick), Heat around 2 tablespoons of oil, Add the Mashed Fish and the Onion-Ginger-Garlic Paste simultaneously, Keep stirring and scraping from the sides and stirring. This step will take some time. Add Salt and red Chilli Powder while you stir.

Mixing
5. While the Fish is being cooked, Boil the Potatoes and mash them

6. When the fish mixture looks dry, add Garam Masala (not much around 3/4th tsp) and Mix Well. You can taste the mixture and temper the seasoning accordingly.

7. Add Salt, Red Chilli Powder, Garam Masala (1/4th tsp) in the mashed Potato and Mix Well. Now add the Fish Mixture and mix very well with your hands, till the potatoes and the fish mixture is completely mixed.

Kebab preparation
8. Add 1 egg (raw) and mix in with the kebab mixture, the mixture will look slimy now. Not to worry, add 2 tablespoons of Besan and little salt (for the Besan) and mix well. If its still slimy and you are not able to bind it into balls then add a bit more Besan. (make sure you don't put extra Besan, because it'll reduce the fish's flavours)

9. Now divide the mixture into small balls and flatten them between your palms to give it the Galouti Kebab shape.

Frying the Kebabs
10. Drizzle very little oil on a non-stick tawa and fry both sides of the kebabs.

Fish Galoutis Ready
Serve Hot with Chutney/Sauce


Monday, December 14, 2015

The Any Time Snack - Garlic Bread Pinwheels

Garlic Bread Pinwheels
Hi....
I have always found Baking Breads very intriguing..There is always an element of suspense from the start till the end..And honestly a delicious home-baked Bread is always a pleasure for the family..
Me n N are one of those couples who find the regular 'Dal-Roti-Sabji' meals extremely mundane.. Its not that we always need something exotic to eat but yes definitely something different.. Some Garlic Bread and a bowl of Soup is one such example of a meal which we both thoroughly enjoy..

So here I was trying my hand at something which I had never tried before.. After browsing through the net I settled for a recipe on 'Café Garima'..
Though I named them 'GARLIC BREAD PINWHEELS'.. They turned out to be so delicious and went extremely well with a bowl of steaming hot soup, a perfect dinner for 'Dilli ki Sardi' ..

GARLIC BREAD PINWHEELS

Makes
: Around 14-15 Pinwheels


Ingredients

For the Dough:
3  cups All purpose flour  (Maida)
1 tsp Instant yeast or 1 1/4 tsp Active dry yeast (If using active dry,proof in 1/4 cup of warm milk and a tsp of sugar from the recipe)
1 tsp sugar
1/2  tsp salt
1 and 1/4 cup warm milk
2 Tbsp olive oil/butter(melted)

For the Filling

2 Tbsp butter at room temperature
1 tsp mixed herbs (Optional) oregano,basil,rosemary and garlic powder,can use fresh or dry
¼ tsp fresh ground pepper
¼ tsp salt (If using unsalted butter)
1 Tbsp minced garlic
2 Tbsp fine chopped cilantro/coriander leaves
2 cubes of Processed Cheese

Procedure1. I think the most important thing while baking a bread is 'proofing of the yeast' .

I used 'Active Dry Yeast'..Proof the yeast by adding the sugar to 1/4 cup of warm milk. Mix well. The milk has to be just the right temperature- not too hot because that will kill the yeast not too cool because the yeast won’t proof. Add the yeast and mix , sprinkle some sugar granules on top of the yeast and rest covered for 10-15 minutes. The yeast should froth like soapy bubbles. If it doesn’t, throw the mix and start afresh.
Please Note : Never ever use the yeast if it hasn't turned foamy.

Left - Foamed Yeast--- Right - Flour
2. In a big bowl, take the flour, salt , melted butter/oil ,sugar and yeast. Mix well.

3.  Now add 1 cup of warm milk little by little in batches and keep mixing the dough.

4. Once the dough starts taking a shape transfer it to a flat surface and knead the dough for around 8-10minutes.
Please Note: Dough should turn soft, if its dry add little milk, if sticky add little flour

5. Transfer the dough into a Oiled Bowl (much bigger than the dough size). Cover with cling film or kitchen towl and leave at a warm place for 1.5 - 2 hrs for it to double in size. This is the second proofing. More than the time the doubling in size is important.

The filling
6. When the dough is almost twice, you can start making the filling in another bowl. Mix all the ingredients (except the cheese) in the bowl. It should look like a spread.

7. Once the dough has doubled, unwrap it and punch down the air gently. Now divide the dough into two halves.

8. Roll each half into a flat oval about 1" in thickness .

9. Spread the butter filling over it and then grate the cheese cube over it (1 cube per roll)
Rolling it Up
10. Now Roll the dough into a cylinder and cut into equal pieces with a sharp knife.

11. Grease you baking dish with butter/oil and place the pinwheels on the baking dish.

Ready to be Baked
12. Cover with cling film and keep for another 15-20 mins for re-proofing. It will rise some more and look fluffy

13. Preheat you oven at 200 degrees Celsius

14. After 20mins are done. Gently brush some milk over the pinwheels (milk-wash).

15. Bake at 180 degrees Celsius for 22-25 minutes till the surface looks golden.

16. Serve Hot.

It goes every well with Soup and you also add some Grilled Chicken to the Menu.
Bon Appétit

Garlic Bread Pinwheels

Saturday, November 28, 2015

The Perfect Simple Vanilla Tea Time Cake

Plain Vanilla Cake
For all those who know me also know my obsession with Baking.Its something which gives me immense pleasure.Its like watching a thriller movie where you can't wait for the climax.Well N (hubby) read somewhere that Baking a cake is quite similar to giving birth.Its because you are creating something yourself.I don't know how it is to give birth to a child but yes if Baking is equivalent then I will definitely choose the latter.That's because I get to have some cake too.
I have tried my hands at quite a variety of cakes,muffins and cheesecakes. From a decadent Chocolate cake, to a Banana Cake, some Carrot Muffins and also a Dulce-De-Leche Cheesecake but somehow whenever I tried to bake a Plain and Simple Vanilla Cake it never turned out perfect. Yes and everytime I had been really disappointed.
Ingredients
I think someone who is passionate about Baking should first get the Basic Plain Cake right, and that is what was not happening for me. But as they say 'You should never stop trying' ,so I again searched for tips and recipes and  finally zeroed in on the Vanilla Cake by Stephanie from 'Joy of Baking' and guess what THIS TIME I NAILED IT!! And Boy Was I happy or Was I Happy!!
Well this one's a No Fancy Plain Vanilla Cake but this can be used as the perfect base for any decorated cake. You can cover it with any kind of icing you want and make it look gorgeous. Just remember at the end of the day however good looking your food is the basic rule is that it HAS TO TASTE GOOD. So very proudly I present to you THE PERFECT VANILLA CAKE.
Note: Though this is one of the simplest cakes ever but the basic thing is what you do and for how long you do is really very important. And probably that is what I wasn't getting right all my previous times. So please note the procedure carefully!! Thanks!

PLAIN VANILLA TEA TIME CAKE

Makes
: Two 9 inch cakes

Beating the Butter and Sugar
Ingredients:


3 cups (345 grams) sifted all purpose flour

1 tablespoon baking powder

1/2 teaspoon salt

1 cup (226 grams) unsalted butter, room temperature

1 3/4 cups (350 grams) granulated white sugar

4 large eggs, at room temperature

2 teaspoons pure vanilla extract

1 cup (240 ml) room temperature milk

Please Note that the Ingredients should surely be at ROOM TEMPERATURE


Preparing the Cake Batter
Procedure:


1. In a bowl, sift or whisk together the flour, baking powder, and salt.

2. In the bowl of your electric mixer, with the paddle attachment, (or with a hand mixer) beat the butter until soft and creamy (about 1-2 minutes).

3. Gradually add the sugar and beat until light and fluffy (about 4-5 minutes). DONOT OVERBEAT.

4. Add eggs, one at a time, beating well after each addition. Scrape down the sides of the bowl as needed.

5. Add the vanilla extract and beat until combined.

6. With the mixer on low speed, alternately add the flour mixture (in three additions) and milk (in two additions), beginning and ending with the flour.


Preparing the Cake Pan
7. Preheat oven to 350 degrees F (180 degrees C) with rack in center of oven. Butter or spray with a non-stick vegetable spray, two 9-inch x 2 inch (23 x 5 cm) cake pans. Then line the bottoms of the pans with parchment or wax paper, then spray the paper and flour the pans.

8. Evenly divide the batter between the two prepared pans, smoothing the tops with the back of a spoon or an offset spatula.

9. Bake 30 to 35 minutes or until a toothpick inserted into the center of the cake comes out clean and the cake springs back when pressed lightly in center. 


Just Baked
10. Place the cakes on a wire rack to cool, in their pans, for about 10 minutes. Then invert the cakes onto a greased rack.

11. Remove the parchment or wax paper and re-invert cakes so that tops are right side up.

12. If you are planning to frost the cake then make sure it has cooled completely, infact you can even chill it for a while in the refrigerator for best results.


When its cake Two is always better than One!! Plain Vanilla Cakes

Friday, October 2, 2015

Instagram Craze and Grilled Ajwaini Prawns

GRILLED AJWAINI PRAWNS
Hiii

INSTAGRAM CRAZE
Its been a crazy last few days...Our employee who helps out with our orders for our e-commerce website decided to go on a long leave, so you can obviously imagine the chaos..Amidst all of that I suddenly got crazy about INSTAGRAM..yes I know the rest of the world has been doing it for years now and I have just started.. So to put it all together I am either working or I am instagramming (I don't think this word even exists lol)..

And obviously there is absolutely no time to cook, still I cannot just cannot have something not favourable on my palate even on those days!! Since I was craving for some prawns the other day N got me some. Since He is allergic to sea-food I had to think of an alternative food also along with the prawns.

So I decided to make something which is SUPER FAST and SUPER EASY and the same ingredients can be used for making Paneer. So here it is


GRILLED AJWAINI PRAWNS (or PANEER)

Prawns

Makes : 20 Medium sized prawns (without the head)

Ingredients

20 Medium sized prawns ( De-veined and head removed)
Salt
Hung Curd - 3 tablespoons
Ajwain (Carom Seeds) - 1.5 tablespoons
Red Chilli Powder - 1/2 teaspoon
Garam Masala Powder - 1/2 teaspoon
Black Pepper Powder - 1 teaspoon
Chat Masala Powder - 1 teaspoon
Juice of 1 whole Lemon
Mustard Oil - 2 teaspoons
Refined Oil - 1 tablespoon

Ingredients

Procedure:

Marinated Prawns
1. Marinate the Prawns with Salt for around half an hour


2. In a separate bowl take all the other ingredients (except the Refined Oil) and Mix very well


3. Spread over the prawns and mix with hand so that all the prawns are properly covered with the marinade.


Lightly Fry the Prawns
4. Keep Aside for second marination for about 1 hour


5. Heat the refined Oil on a non-stick tawa and grill/fry the prawns lightly on both sides.


6. Don't overdo the prawns or they will turn hard (around 1-2 mins each side till its golden in color)


7. Serve Hot with ketchup or chutney
Grilled Ajwaini Prawns .. Served Hot
NOTE: Procedure is exactly same for Paneer
Thanks for taking out time to read!! Ciao!